
Writing and Uploading the "Bad Joke Crickets Sound" Android Application.
Last updated June 17, 2013
This Tutorial Assumes You Know Something About Programming
I'm not going to go into any programming basics. Native Android applications are written in java. There are plenty of tutorials on how to program and how to program in java. However, this tutorial is pretty detailed - even if you don't know programming, you might just pick up some knowledge. :) This tutorial also covers the basics of getting the app uploaded to Android Market.
Getting Started
I first registered with Google, then downloaded all of the tools as specified on the following pages. Both are great articles on getting set up to write an android application.
Figure Out What You Want to Do
The first thing you need is an idea for writing an android application. My idea actually came from a friend who posted on facebook that he wanted an application that he could use to play crickets whenever a friend of his told a bad joke. I thought that sounded pretty easy to do as a first application, no game strategy, keeping track of data, or complicated user interfaces. So I wrote out what I wanted the application to do.
- Press a button
- Play a cricket sound
- Have a way to close it
I Used Eclipse
The two set up examples use Eclipse, which is a good IDE (integrated development environment). Eclipse could be used to write any java application but allows the Android plugin which the linked examples above shows you how to install. When you start up Eclipse, it will ask you where you want your workspace, which is where all your application files will live on your computer. Make sure you know where on your computer you specified your workspace, as you will need to copy files here.
Start a New Project
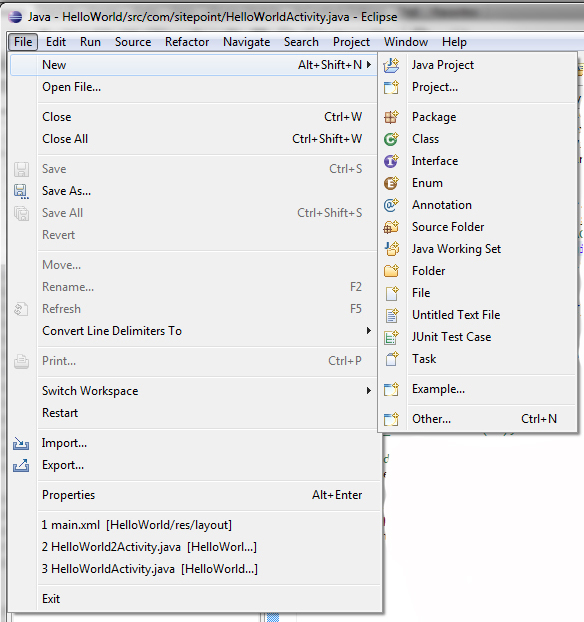
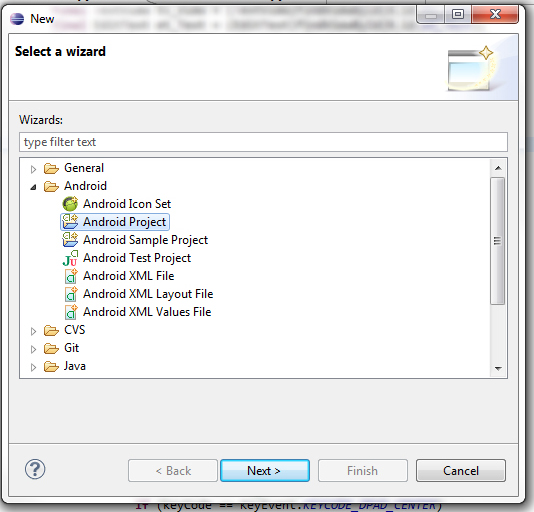
Here's how you start your new application. Go to File -> New -> Other -> Android Application:
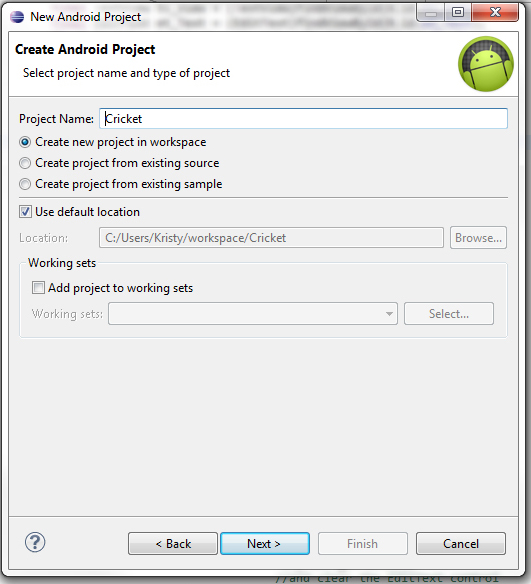
Pick the name of your package here.
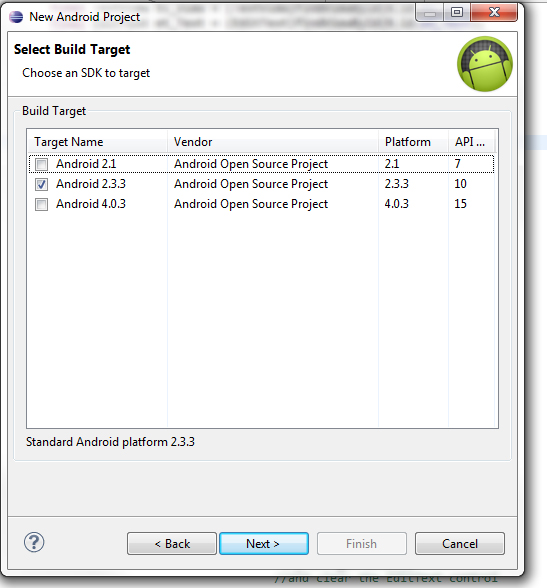
Make Sure you pick the lowest level of Android so that the maximum number of devices can use your application.
Pick the name of your package - it must be unique!
I usually put the name of my company first.
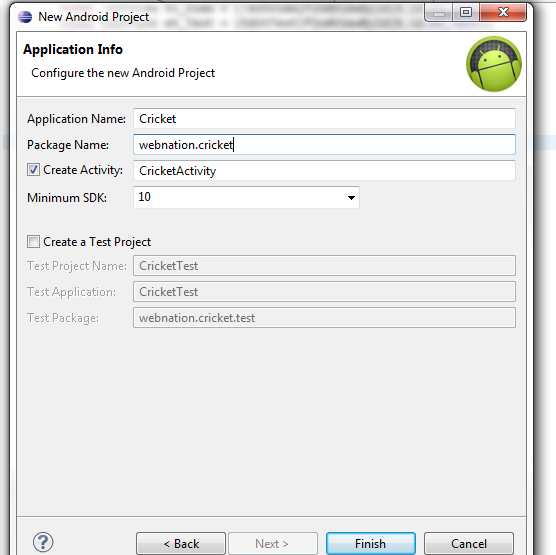
All Done Setting up Application - Ready for code
Now you need to do some coding. If you have any coding experience, a lot of this will make sense, even if you have no java experience. Java is a good object oriented code, so if you understand the principals, you'll get this. If you have no coding experience, you can still follow along and figure out what's going on.
Looking at the code
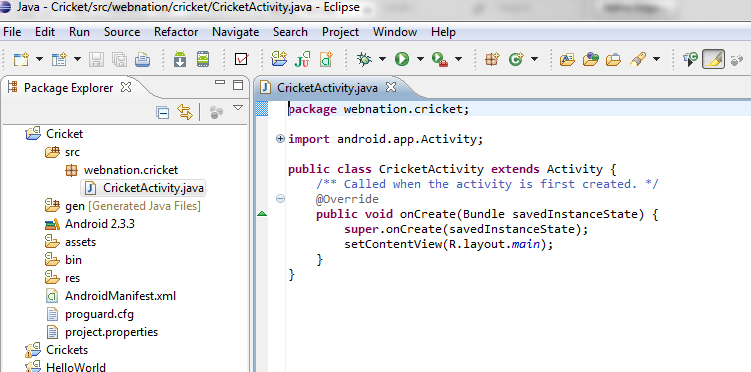
Click on the name of your project to expand the directories under there, then click on source, or "src". You will see <yourpackagename.java>. Click on that to bring up the code in the window. You will see:
Laying out Buttons and Other Objects in Android
The next thing I wanted to do was draw a button and have the user be able to touch it on screen and have it play crickets. I also decided it would be a good thing to have a button to close out the application immediately. I mean, what if you're playing the noise and you want to stop immediately? Crickets can be annoying. So I had to figure out how to draw buttons on the screen.
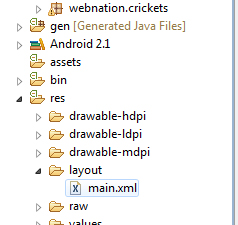
The UI (user interface) is all defined in one file in your package. This is under YourPackageName -> res -> layout, in a file called main.xml. We will be talking about this file a lot
For an excellent tutorial on how to layout buttons and other objects on the android screen, you should refer to: http://mobiforge.com/designing/story/understanding-user-interface-android-part-1-layouts.
I was going to use standard Android buttons, but I decided to use pictures as buttons instead, and then I decided to have 4 choices of sounds. For my close button, I just used a regular android button. For the picture buttons, I needed to use ImageButtons. I wanted to layout the buttons in a grid, so I decided to use a RelativeLayout format in main.xml. I was going to use an AbsoluteLayout, but I read that that layout format was deprecated, meaning that this format would only be supported for a limited time into the future.
For my pictures, I wanted to be legal, so I purchased the graphics at Fotalia.com. You can decide not to do this, but you could get hit with copyright violations if you do this, so I spent the $1 per picture for each of my crickets. Once you have the graphics files, you need to size them using whatever graphics program you have and then place them in the graphics folders. Android runs on a variety of device sizes and they have different folders for each size. I decided not to size the graphics physically for each size (laziness). I got around calling out each of the sizes by using dp sizing. I called out the size of each button in my main.xml. dp is a universal pixel size and will scale up and down, depending on device size.
A Note About Errors
Eclipse is good about showing you any errors in your code if you have them. It will make lots of suggestions about what to do. Eclipse practically corrects the errors for you. Beware: One wayward punctuation mark will kill you.
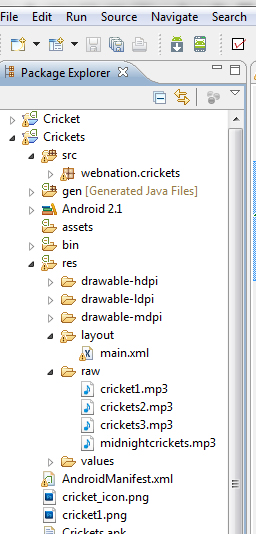
Where to place the graphics
Here's where the graphics folders are located.
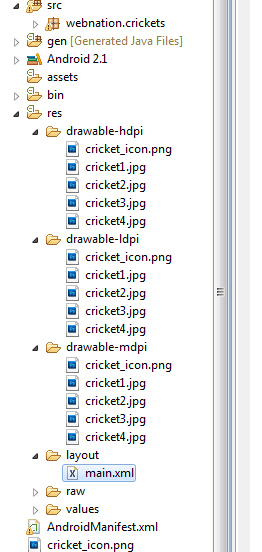
If you notice, I dropped the same files into each folder. Like I said, I am going to let my layout call out the sizing for the different size devices. You can cut and paste right there in Eclipse or use Windows Explorer. You can right-click and hit "Refresh" to see the files you have added to this directory.
Almost everything in the main.xml is critical to getting the app right. One slip up and you will see errors when you compile. Here are some main highlights of my file:
- I selected the layout type as "verticle".
- "@drawable" refers to each folder for its specific device type.
- "@id" refers to the name of each element. You will need to know these when you are writing the java code.
- For the image buttons, the background was set to the name of the cricket graphics
- When you are inputting the name of the graphics, you don't have to specify the .extension of the file (like .jpg). Android knows how to select the right file.
- The ImageButtons need to be clickable and focusbable
- You can spell out the text for the Buttons and TextView here or define them in the string.xml file. Not going into how to define that in this tutorial.
- I didn't need to specify the file extensions (.jpg) in the call outs. Android knows all.
In this case, we have 2 TextViews, 4 ImageButtons and one Android Button. The Android button will just close out the application, immediately stopping all of the noise. Each of the ImageButtons will be used to have a cricket noise play as soon as it is touched.
My final main.xml:
<?xml version="1.0" encoding="utf-8"?>
<RelativeLayout xmlns:android="http://schemas.android.com/apk/res/android"
    android:layout_width="fill_parent"
    android:layout_height="fill_parent"
    android:orientation="vertical">

<TextView
        android:layout_width="fill_parent"
        android:layout_height="wrap_content"
        android:text="Heard a Bad Joke? No Response to a Question?"
        android:id="@+id/tv_View1"
        />

<TextView
        android:layout_width="fill_parent"
        android:layout_height="wrap_content"
        android:text="Touch a Cricket and Make it Sing!"
        android:id="@+id/tv_View"
        android:layout_below="@+id/tv_View1"
        />

 <ImageButton android:id="@+id/buttonCricket1"
               android:layout_height="125dp"
               android:layout_width="125dp"
               android:layout_marginTop="10dp"
               android:background="@drawable/cricket1"
               android:layout_below="@+id/tv_View"
               android:focusable="true"
               android:clickable="true"
               android:layout_alignLeft="@+id/tv_View"/>

 <ImageButton android:id="@+id/buttonCricket2"
               android:layout_height="125dp"
               android:layout_width="125dp"
               android:layout_marginTop="10dp"
               android:background="@drawable/cricket2"
               android:layout_below="@+id/tv_View"
               android:focusable="true"
               android:clickable="true"
               android:layout_alignRight="@+id/tv_View"/>

 <ImageButton android:id="@+id/buttonCricket3"
               android:layout_height="125dp"
               android:layout_width="125dp"
               android:layout_marginTop="10dp"
               android:background="@drawable/cricket3"
               android:layout_below="@+id/buttonCricket1"
               android:focusable="true"
               android:clickable="true"
               android:layout_alignLeft="@+id/buttonCricket1"/>


 <ImageButton android:id="@+id/buttonCricket4"
               android:layout_height="125dp"
               android:layout_width="125dp"
               android:layout_marginTop="10dp"
               android:background="@drawable/cricket4"
               android:layout_below="@+id/buttonCricket2"
               android:focusable="true"
               android:clickable="true"
               android:layout_alignRight="@+id/buttonCricket2"/>


  <Button android:id="@+id/bottom"
          android:layout_width="fill_parent"
            android:layout_height="wrap_content"
            android:text="Close"
            android:layout_marginTop="10dp"
            android:layout_gravity="center"
            android:height="30dp"
            android:layout_below="@+id/buttonCricket4"
          />


</RelativeLayout>
|
Setting Color in the main.xml file
You can also set the color of the elements and the background in the mail.xml file. For instance, you could specify the color of the TextView tv_View1 text to be GREEN with this code:
<TextView android:layout_height="wrap_content"
             android:layout_width="fill_parent"
             android:id="@+id/tv_View1"
             android:textColor="#00FF00"
              />
Seeing what the main.xml file will look like
You can see what the layout will look like in the Graphical Layout (see image below).

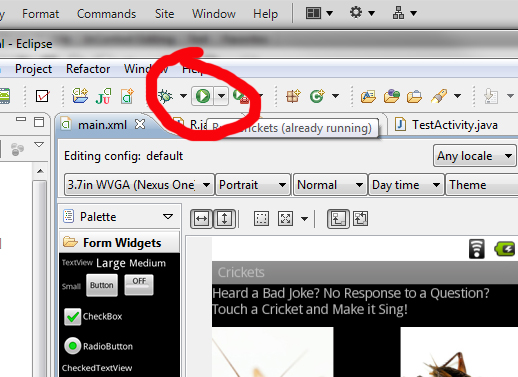
Running the Application so Far:
If you have not started the emulator up by now (the "Writing Your First Android App" tutorials should have shown you how), you need to get the emulator running. In both tutorials, it said that the emulator takes a long time to get up and going, and this is true. So fire that emulator up. (If you don't want to look up how in the tutorials, it's here in Eclipse: Windows -> AVD Manager.) Once it is running, you can press the "play" button, to see what your application will look like. Obviously, nothing will happen when you click on the buttons since you've written no code.
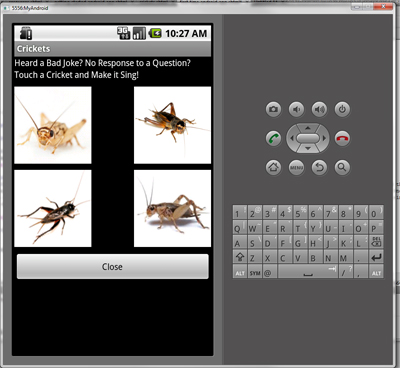
Your emulator should look like this:
Coding the Buttons to Do Something
Go back to your java file. At the very top, there are import call outs. These statements load classes into the java routine that you can use. Without these statements, Java will not know what you are talking about with your code. How the classes work is beyond the scope of this application. You can look up java tutorials online.
For our application, add the following import statements to your code immediately below the first two import statements in your base code:
import android.graphics.Color;
import android.media.MediaPlayer;
import android.view.View;
import android.widget.TextView;
import android.widget.Button;
import android.widget.ImageButton;
import android.view.MotionEvent;
Here's what each of the imports does:
- We need the Color class so we can call out the colors by name and not have to use the bitwise color designations (like #FFFFFF for white).
- We are going to use the native Media player functionality built into Android so we need to import this class.
- We need to import the View class so we can add objects to the android Screen.
- We are going to write text to the screen, so we need the TextView class.
- We need to import the Button and ImageButton classes to work with the Buttons
- We need the MotionEvents so we can interact with the screens.
Don't Touch the First Four Lines of Code in your Base Java File.
These lines of code are automatically generated when you create a new Android project. You need these four lines to create and start the Android application:
public class CricketsActivity extends Activity {

@Override
public void onCreate(Bundle savedInstanceState) {
    super.onCreate(savedInstanceState);
Linking Your main.xml File to Your Code
You link your main.xml file, that you've worked so hard on by adding this code right after the auto-generated code:
setContentView(R.layout.main);
Creating The Objects in Code
Now we need to instantiate each screen object you created in the main.xml file. What this means is that we will call each of them into being (like magic!) so we can tell the program how these objects should behave on the screen. We will instantiate each object this with this code. I've only given you an example of each type of object, you will need to write code for all of the buttons and text views:
final TextView tv_View = (TextView)findViewById(R.id.tv_View);
Button bottom = (Button) findViewById(R.id.bottom);
ImageButton buttonCricket1 = (ImageButton) findViewById(R.id.buttonCricket1);
Remember the "id" in the main.xml file? You need to call out each of the objects by their names and the type of object needs to match exactly with the types you laid out in the main.xml file. If you don't match up the objects properly, you will get an error. In the above example, I only called out one of each type of object that we laid out in the main.xml file. You'll need to do this for each object. (You can see all of the code at the end of this tutorial.)
Adding Color via Java Code
You can set the color of the text views and buttons laid out in the main.xml. Here is an example of the code you can use. Note that this will override any colors you specified in the main.xml file. Remember importing the android.graphics.Color class set earlier? That's where all of the colors are defined.
tv_View1.setTextColor(Color.WHITE);
bottom.setTextColor(Color.BLACK);
tv_View.setBackgroundColor(Color.LTGRAY);
The above code would override any colors set in the main.xml.
Have You Instatiated Each Object from the main.xml File?
Check the main.xml file and make sure you have created an instance of each object. If you added any color to the buttons, you should be able to see any changed by pressing the "Play" button (like you did above to run the application).
Adding the Sound Clips
I needed some cricket sound clips, so I went to the following website: http://soundjax.com/cricket-1.html. I downloaed 4 of the mp3 clips. This website just happened to be the first one that popped up when I did a search in Google.
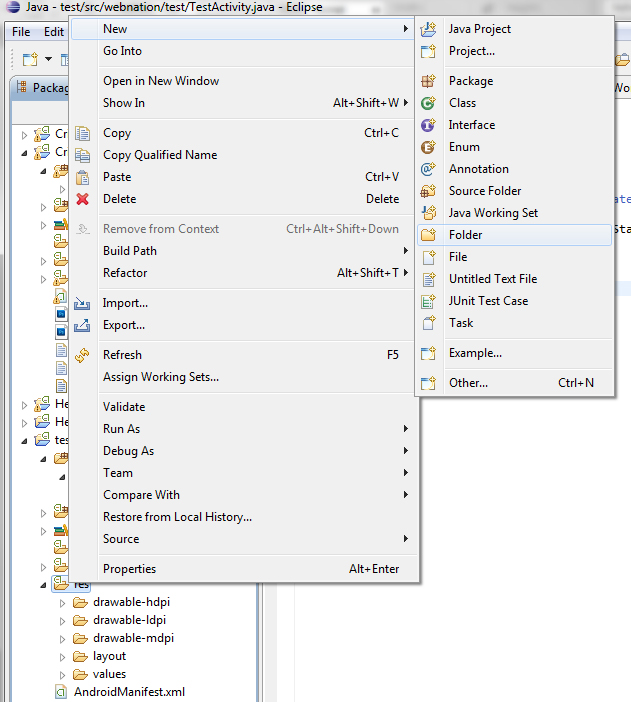
Now that you've downloaded your files, you need to place them in the correct folder so your application can find them and play them. I created another folder under the /res/ directory, called /res/raw/. Right Click on the /res/ directory, select New -> Folder, and name it raw.
Copy the files to the directory using Windows Explorer or other system utility.
Now that these files are in place (hit Refresh to see the directories with their newly added files), you need to instantiate an instance of Android's MediaPlayer for each one. Here is the code to do that:
final MediaPlayer cricketnoise1 = MediaPlayer.create(this, R.raw.cricket1);
final MediaPlayer cricketnoise2 = MediaPlayer.create(this, R.raw.crickets2);
final MediaPlayer cricketnoise3 = MediaPlayer.create(this, R.raw.crickets3);
final MediaPlayer cricketnoise4 = MediaPlayer.create(this, R.raw.midnightcrickets);
You'll get errors in Eclipse if you add this code before the files are in place in the /res/raw/ directory. Notice you don't put the file extension (.mp3) in the code. You'll also get an error if you have two files with the same name, but different file extensions in the same directory. For instance, you can't have these two files in the same directory: cricket1.mp3 and cricket1.wav. Android won't know which file to use.
Adding the Touch Screen Behavior
Now that you have instantiated the objects, including the MediaPlayers, let's give them some actionable behavior capability by the user.
You can set up TouchListeners, which will be on the look out for any touch action to a button or screen. In this case, you will need to add an onTouchListener for each of the buttons. In this case, we have 4 ImageButtons and one "regular" Button. Each one needs a listener added to it. Within the adding of the onTouchListener, you need to define what action your application needs to perform once the button is touched. Here's the code to add a listener to one of the ImageButtons:
    buttonCricket1.setOnTouchListener(new View.OnTouchListener() {
    	public boolean onTouch(View v, MotionEvent event) {
    	  cricketnoise1.start();
          return true;
        }
      });
The action we want the application to perform is to play the cricket noise MP3. To get the media player to play the MP3, you call the start() method in the MediaPlayer class. Remember, you will need to add an onTouchListener to each ImageButton. Cutting and pasting is your friend.
For the "regular" button, the behavior we want the application to perform is different. When this button is touched, we want to close out the application and also to release the resources used by each of the media players we instantiated in the beginning of the program. In the above code, the call to the finish() method closes out the application. The behavior we want the Button called "bottom" (the "regular" button) once it is touched is defined by:
    bottom.setOnTouchListener(new View.OnTouchListener() {
    	public boolean onTouch(View v, MotionEvent event) {
       	  cricketnoise1.release();
    	  cricketnoise2.release();
    	  cricketnoise3.release();
    	  cricketnoise4.release();
          finish();
          return true;
        }
      });
That's it, that's the entire program.
Finished code:
package webnation.crickets;

import android.os.Bundle;
import android.app.Activity;
import android.graphics.Color;
import android.media.MediaPlayer;
import android.view.View;
import webnation.crickets.R;
import android.widget.TextView;
import android.widget.Button;
import android.widget.ImageButton;
import android.view.MotionEvent;

public class CricketsActivity extends Activity {
/** Called when the activity is first created. */
@Override
public void onCreate(Bundle savedInstanceState) {
    super.onCreate(savedInstanceState);
    setContentView(R.layout.main);

    final MediaPlayer cricketnoise1 = MediaPlayer.create(this, R.raw.cricket1);
    final MediaPlayer cricketnoise2 = MediaPlayer.create(this, R.raw.crickets2);
    final MediaPlayer cricketnoise3 = MediaPlayer.create(this, R.raw.crickets3);
    final MediaPlayer cricketnoise4 = MediaPlayer.create(this, R.raw.midnightcrickets);
    final TextView tv_View = (TextView)findViewById(R.id.tv_View);
    final TextView tv_View1 = (TextView)findViewById(R.id.tv_View1);
    Button bottom = (Button) findViewById(R.id.bottom);
    ImageButton buttonCricket1 = (ImageButton) findViewById(R.id.buttonCricket1);
    ImageButton buttonCricket2 = (ImageButton) findViewById(R.id.buttonCricket2);
    ImageButton buttonCricket3 = (ImageButton) findViewById(R.id.buttonCricket3);
    ImageButton buttonCricket4 = (ImageButton) findViewById(R.id.buttonCricket4);
     tv_View.setTextColor(Color.WHITE);
     tv_View1.setTextColor(Color.WHITE);
    bottom.setTextColor(Color.BLACK);

    bottom.setOnTouchListener(new View.OnTouchListener() {
    	public boolean onTouch(View v, MotionEvent event) {
       	  cricketnoise1.release();
    	  cricketnoise2.release();
    	  cricketnoise3.release();
    	  cricketnoise4.release();
          finish();
          return true;
        }
      });

    buttonCricket1.setOnTouchListener(new View.OnTouchListener() {
    	public boolean onTouch(View v, MotionEvent event) {
    	  cricketnoise1.start();

          return true;
        }
      });
    buttonCricket2.setOnTouchListener(new View.OnTouchListener() {
    	public boolean onTouch(View v, MotionEvent event) {
    	  cricketnoise2.start();
          return true;
        }
      });
    buttonCricket3.setOnTouchListener(new View.OnTouchListener() {
    	public boolean onTouch(View v, MotionEvent event) {
    	  cricketnoise3.start();
          return true;
        }
      });
    buttonCricket4.setOnTouchListener(new View.OnTouchListener() {
    	public boolean onTouch(View v, MotionEvent event) {
    	  cricketnoise4.start();
          return true;
        }
      });

  }

}
|
Adding an Icon to Your Application
All Android apps comr with a default icon that will show up as the launching icon on your phone once you install it. This icon is generic and is called ic_launcher.png, and is located in the drawable folders. The icon is 32x32 pixels for the low resolution devices in folder /res/drawable-ldpi/, 48x48 pixels in the medium res devices in folder /res/drawable-mdpi/, 72x72 pixels for the large devices in folder /res/drawable-hdpi/. If you want a custom icon (recommended), you'll need to create new icons of the above named sizes. You can either replace the files with your own of the same filename or change the name of the icon in the manifest file.
The Android Manifest File
In your list of files, there is a file called AndroidManifest.xml. Click on it to open it. You'll get the graphical version when you open it - click on the AndroidManifest.xml tab to see editable xml code.
<?xml version="1.0" encoding="utf-8"?>
<manifest xmlns:android="http://schemas.android.com/apk/res/android"
    package="webnation.crickets"
    android:versionCode="1"
    android:versionName="1.0" >

    <uses-sdk android:minSdkVersion="3" android:targetSdkVersion="7"  />
    <supports-screens  android:largeScreens="true"   android:normalScreens="true"  android:smallScreens="true"/>

    <application
        android:icon="@drawable/cricket_icon"
        android:label="@string/app_name"
        android:screenOrientation="portrait"  >
        <activity
            android:name=".CricketsActivity"
            android:label="@string/app_name" >
            <intent-filter>
                <action android:name="android.intent.action.MAIN" />
                <category android:name="android.intent.category.LAUNCHER" />
            </intent-filter>
        </activity>
    </application>

</manifest>
|
Important things about AndroidManifest.xml file:
- You can change the name of the icon in this file.
- You can change the version number of the icon in this file
- You can change which screens your application can handle. I recommend that you change it to the settings I have in my android file.
- You can change the versions of Android that this application can handle. I would recommend the settings that I have in my android application.
- You can set the orientation of the application (portrait or landscape).
Orientation of the Application
I uploaded the application to the android market and tested it. Android knows which way you are holding your phone/tablet, so if you tilt the phone, it can switch from portrait to landscape set up. My application blew up when it went into landscape mode. So I hardcorded the orientation to "protrait" in the Android Manifest file. (See the above Android manifest file.)
Versions of Android Which Can Handle Your Application
Android Market filters out applications which are not suitable for your phone. When I started writing this app in February of 2012, my phone is about a year old, and apparently and was too old to run the version of Android my package was first written for. I compiled the program originally for Android 2.3. When I first uploaded my file to the Marketplace, I could not see it on my phone. I had to completely start over from scratch and pick the oldest version of Android when creating my project, which was in this case 2.1. I also had to make the following changes in the AndroidManifest.xml file:
<uses-sdk android:minSdkVersion="3" android:targetSdkVersion="17" />
By placing the min SDKVersion as "3", this allows all devices from Android 1.5 and up to run the application.
Versioning and Upgrading your App Once You Have Uploaded It
If you make changes to your application, but you've already uploaded it to the Android Market, the only way to get a new copy uploaded is to change the version number. You need to manually do this in the AndroidManifest.xml file.
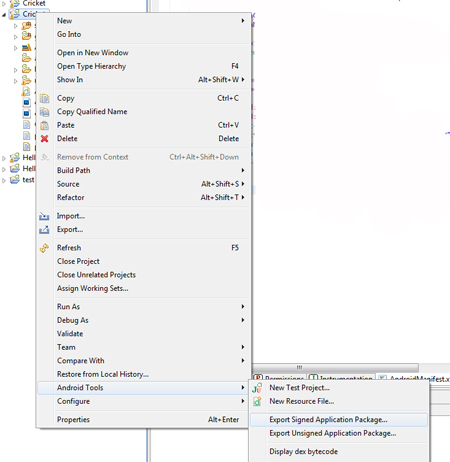
Exporting Your Android Application into an Uploadable Package
You need to export a signed package in order to upload your application to the Google Market Place. A signed application has a keycode, which Eclipse will allow you to create during your package export. You right click on your project, then go to Android Tools -> Export Signed Application.
Pick a keycode location and you will have to create a password for the keycode. Write this down in case you are planning to write any other applications, or planning on upgrading this application in the future. The Exporting system will also ask you to pick a place to put your signed package. Make a note of where this is.
Uploading Your Finished Application
You need to go to https://play.google.com/apps/publish/. If you haven't paid your fee to Google and registered to submit applications, now is the time. There is no way to avoid paying the fee.
Naming Your Application so You Can Find it on the Android Market Place (Google Play).
Before uploading, I did a search on the Android Market place for "Crickets". There were literally hundreds of android applications. Cricket is a very popular sport in India and other formerly British empire countries, so there were lots of applications with that name. It's why I picked "Bad Joke Cricket Sound" as the name of my uploaded application. I wanted people (mainly me and the friend I wrote the application for) to be able find it.
Other Things You Need to Know About Uploading
After you upload your signed package (in my case, Crickets.apk), you will be taken to a screen that will allow you to put in the details of the application. You will need to have a couple of screen shots ready and a high resolution graphic for the application. The form will tell you the particulars of what characteristics the graphics must have. You'll also be asked to describe the graphic. Here's where you need to place any search terms you want to help people find your application.
You will also need to set a price, and tell google what your privacy policy is, if any.
Hit the publish button, and voila! You are an Android Developer.
Uploading Your App to the Amazon Android App Market
The Amazon Kindle Fire runs on Android and if your app is not overly complicated, it should run fine on the Kindle Fire. With so many of these devices already sold, it's important to get your app out on the Amazon App market as well as Google Play.
https://developer.amazon.com/home.html
How Long Will it Take for my Application to Show up on Google Play?
When you upload your final project you will be told that it can take several hours to appear on the market. Google Play has no review process, so it should happen quickly. In my case, it took a couple of hours.
Finished Application
Here is the finished application (you can download it to your Android device): Bad Joke Cricket Sounds Application. On Android Market, do a search for "Bad Joke "Cricket Sound".